•Define Containers to be Printed
The EDGE Label Printing feature is available for containers in the Chain of Custody (COC) Manager. This article explains how to configure label content using the Label Printing feature.
Define Containers to be Printed
1.Open the COC Manager from the Tools group on the Home ribbon.

2.Create a COC and add samples. Please read Create a Chain of Custody for more details about this process.
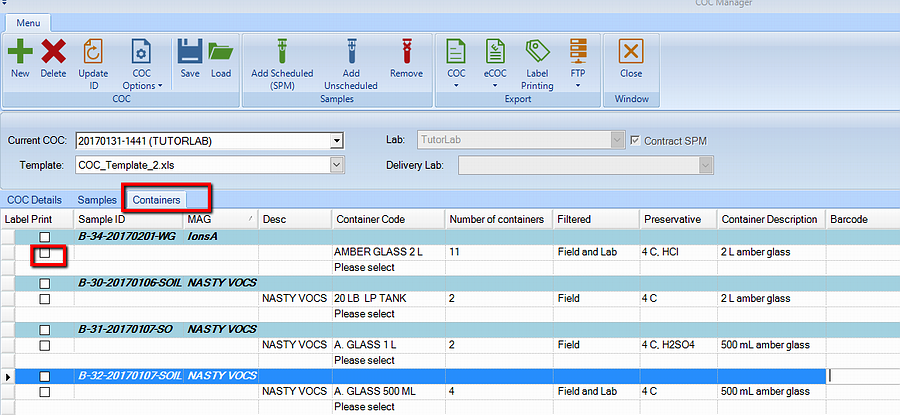
3.In the Containers tab, select which labels will be printed by checking the box in the Label Print column. If no containers are selected, then all labels will be printed.
Print Labels
Within the Export group, select Label Printing.
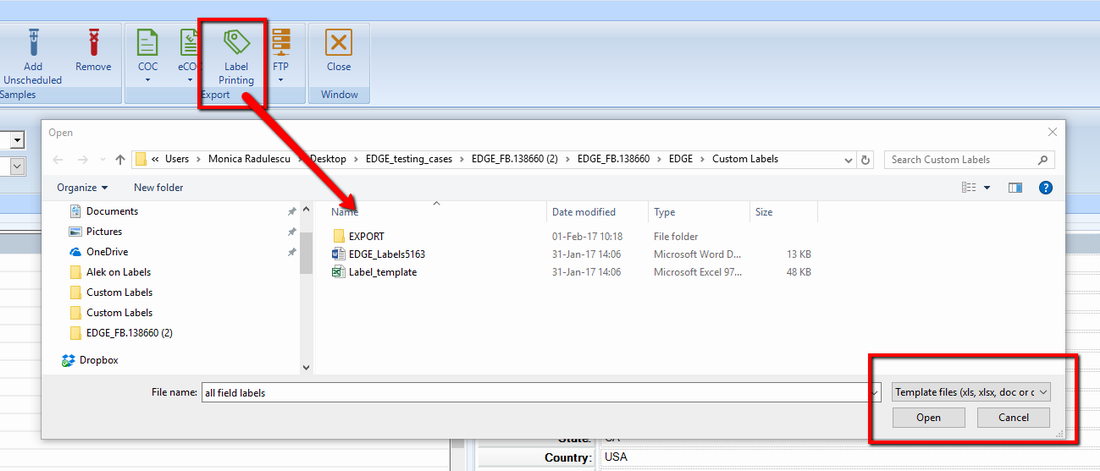
EDGE will prompt the user to select a template from the Custom Labels folder (EDGE\Custom Labels). Depending on the template selected, an Excel or PDF file will automatically be created with the selected containers and be configured based on the template. For fields which have no data, a blank line will be printed. The generated label file is placed in the \EDGE\Custom Labels\EXPORT folder.
Open the exported labels file. A Print Preview window will appear, allowing the labels to be reviewed prior to printing. Click Print to send the document to the default printer, which will automatically start printing.
Label Templates
EDGE exports container data to a Microsoft Excel file (*.xls, *.xlsx) or PDF via a Microsoft Word (*.doc, *.docx) template. Example templates for Excel and for Word (using an Avery 5163 label sheet (2 x 4 inches)) are provided with EDGE. Each template's format and setup are detailed below. Changes made to the templates must be completed before opening EDGE.
Microsoft Excel Template
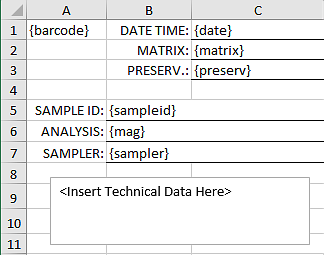
Labels generated from Excel can be configured in the Label_template.xls file found in the Custom Labels folder (EDGE/Custom Labels).
The image below shows the sample template from Label_template.xls. All keywords in curly brackets { } are replaced with data from EDGE, and may be changed to other fields.
The template file also includes the following list of available field in the Available Fields worksheet.
Field Label |
EDD/EDP Table |
Column |
|---|---|---|
TASK |
ContractMagSPM_Bottles |
TASK |
SAMPLEID |
ContractMagSPM_Bottles |
SYS_SAMPLE_CODE |
MAG |
ContractMagSPM_Bottles |
METHOD_ANALYTE_GROUP_CODE |
FRACTION |
ContractMagSPM_Bottles |
FRACTION |
METHOD |
ContractMagSPM_Bottles |
METHOD |
TAT_DAYS |
ContractMagSPM_Bottles |
TAT_DAYS |
HOLD_YN |
ContractMagSPM_Bottles |
HOLD_YN |
LAB |
ContractMagSPM_Bottles |
LAB |
LOCATION |
FieldSample_v1 |
SYS_LOC_CODE |
SAMPLER |
FieldSample_v1 |
SAMPLER |
MATRIX |
FieldSample_v1 |
SAMPLE_MATRIX_CODE |
FACILITY |
ContractMagSPM_Bottles |
FACILITY |
PRESERV |
ContractMagSPM_Bottles |
PRESERV |
FILTERED |
ContractMagSPM_Bottles |
FILTERED |
SAMPLETYPE |
FieldSample_v1 |
SAMPLE_TYPE_CODE |
BARCODE |
1D or 2D, configured in EDGE Options |
NA |
CONTAINER_DESC |
ContractMagSPM_Bottles |
CONTAINER_DESC |
MAG_REMARK |
ContractMagSPM_Bottles |
MAG |
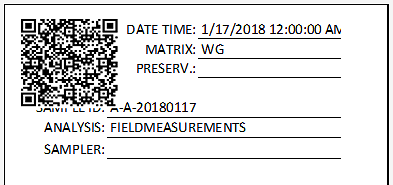
The image below is an example export from EDGE using the example Excel template.
Barcode Options
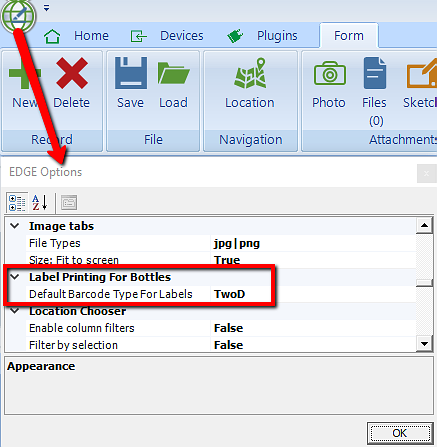
EDGE may be configured to print either 1D or 2D barcodes by using the Default Barcode Type for Labels setting, which is found in the Label Printing for Bottles section of EDGE Options.
Microsoft Word Template
Labels generated from Word can be configured in the example EDGE_Labels5163.docx file found in the Custom Labels folder (EDGE/Custom Labels).
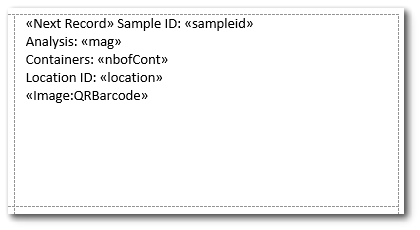
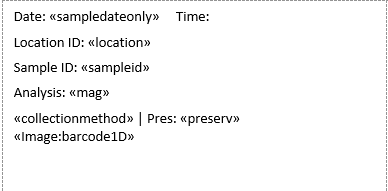
The image below shows the sample template from EDGE_Labels5163.docx. All keywords in arrows (« ») are replaced with data from EDGE, and may be changed to other fields.
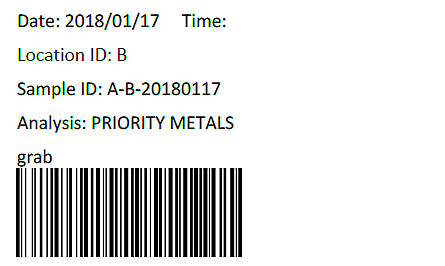
The image below is an example export from EDGE using the example Word template.
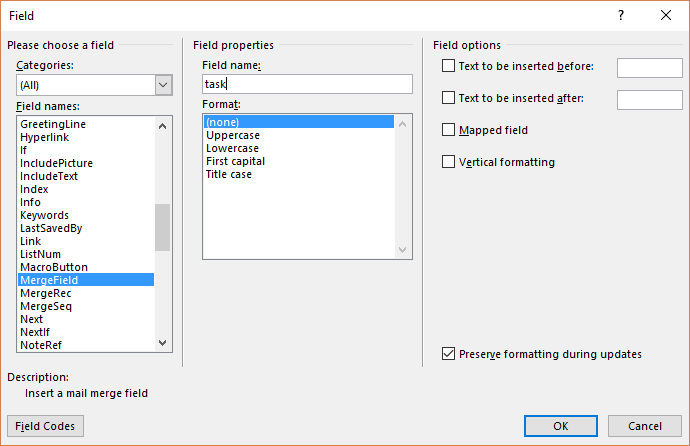
To configure EDGE fields, in the Insert tab, click Quick Parts > Field

Select MergeField for the Field Names, then manually type the EDGE field desired in the Field name box, use Field options to add text. In the image below, task is being added.
Below is a list of available EDGE fields.
Field Label |
EDD/EDP Table |
Column |
|---|---|---|
TASK |
ContractMagSPM_Bottles |
TASK |
SAMPLEID |
ContractMagSPM_Bottles |
SYS_SAMPLE_CODE |
MAG |
ContractMagSPM_Bottles |
METHOD_ANALYTE_GROUP_CODE |
FRACTION |
ContractMagSPM_Bottles |
FRACTION |
METHOD |
ContractMagSPM_Bottles |
METHOD |
TAT_DAYS |
ContractMagSPM_Bottles |
TAT_DAYS |
HOLD_YN |
ContractMagSPM_Bottles |
HOLD_YN |
LAB |
ContractMagSPM_Bottles |
LAB |
LOCATION |
FieldSample_v1 |
SYS_LOC_CODE |
SAMPLER |
FieldSample_v1 |
SAMPLER |
MATRIX |
FieldSample_v1 |
SAMPLE_MATRIX_CODE |
FACILITY |
ContractMagSPM_Bottles |
FACILITY |
PRESERV |
ContractMagSPM_Bottles |
PRESERV |
FILTERED |
ContractMagSPM_Bottles |
FILTERED |
SAMPLETYPE |
FieldSample_v1 |
SAMPLE_TYPE_CODE |
SAMPLEDATE |
Entered in the field |
|
SAMPLEDATEONLY |
Entered in the field |
|
CONTAINER_DESC |
ContractMagSPM_Bottles |
CONTAINER_DESC |
MAG_REMARK |
ContractMagSPM_Bottles |
MAG |
PROJECTID |
Entered in the field |
|
SAMPLETIME |
Entered in the field |
|
COLLECTIONMETHOD |
Entered in the field |
|
To add barcodes to the Word template, insert a MailMerge field following the steps above. In the Field Name field, enter one of the following:
"Image:Code128BBarcode" – Inserts standard barcodes
"Image:QRBarcode" – Inserts QR codes
Barcodes generated by this template will display the SYS_SAMPLE_CODE (SAMPLEID). If the barcode needs to show other data, please use Avery Design and Print Online, or another barcode generator.
Tip: If the barcode or QR code does not appear or appears cut off in the report output, reduce the spacing or text field size in the Word template to allow additional space for the image. |
Below is an example Word template setup that includes a QRCode
